

31 March 2013
28 March 2013
My new craft space

I finally have a craft space I feel good about. It is light and practical. My table is huge and I love my new cabinets ! I feel very comfortable there and I can't wait to start crafting !
Read this previous post if you are interested in the details of where I got the furniture.


This is the mini cabinet I used for the Ice Cream party.
Love it with my ribbons inside !

Spool holder form The Makery.


27 March 2013
{Craft} Easter treat bags
I loved the bunny ear bags (featured on monday) so much that I couldn't wait till Easter and I ended up making some for a little playdate we had today !!!
They were quite quick to make and I love the end result, so cute !

Instead of velum paper I used Decopatch paper left over from this hot air balloon decoration I made last year.

The only thing I changed from the tutorial was to glue the decorative paper in the ears at the beginning, just after cutting the bags. I found it easier than gluing them at the end.

Make sure you visit Oh Happy Day! for the complete tutorial.
They were quite quick to make and I love the end result, so cute !
Instead of velum paper I used Decopatch paper left over from this hot air balloon decoration I made last year.


Make sure you visit Oh Happy Day! for the complete tutorial.
25 March 2013
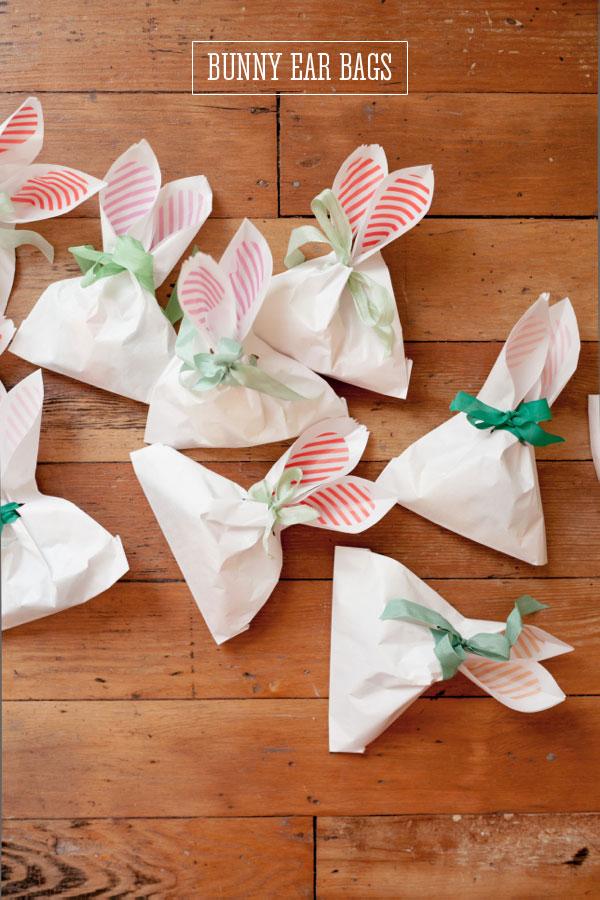
{Pin of the week} Bunny Ear Bags
Last week my favorite craft had to be these ultra sweet Easter treat bags from Oh Happy Day! We are getting ready for our Easter egg hunt on sunday and I think these would be perfect for hiding in the garden!

Follow the link for the tutorial.
20 March 2013
Craft Room Makeover

I have been wanting some craft room cabinets for a while but nobody seems to sell such furniture in England... (anybody want to start a new business ??).
So now that I am in the US, I have finally been able to order new furniture !!! I am very excited, however it's going to take me forever to put them up, there are all self-assembly !!!
I can't wait to share the pictures of my new "work" space with you.

As you can see from the pictures above, my current work space is a mess. I haven't really been able to sit down at the desk since we moved a month ago, because there is always so much junk "appearing" on it. Everybody just dumps things there and the children constantly help themselves and play with my supplies (no, not funny when whole boxes of buttons end up on the floor !). So I need storage, with doors that close ! And a BIG table where I can actually do some work (this mini desk is far too small for any project).
I won't be able to do anything to the walls though because we are renting this house, so they will stay plain white. But fortunately I have fantastic windows right there so I can get plenty of natural light and they are a nice feature.
After seeing this craft room makeover, I really wanted to invest in some cabinets form The Original Scrapbox. However, after reading reviews and looking closely at the designs, I decided these were not for me. They definitely seem more suitable to scrapbookers or quilters. All the little drawers might not be as convenient for me since my party supplies can be a bit bulky. A few reviews also commented on the very high price tag for self-assembly furniture.
So I kept looking. And I found exactly what I was looking for at the Home Decorators Collection (I am not getting paid or receiving any compensation from this company, I am just sharing with you the furniture I liked most). Funnily enough their craft room storage collection is from the Martha Stewart range, I should have known !

I ordered the big storage cabinet on the left and a craft table. Mine are off white (picket fence to be exact) but they come in grey, green and dark wood too. Although white might not look the greatest right now with the white walls, I need something that will work for me long term. And if I ever get to decorate my own craft room, I will definitely put some colour on the walls, so white should look great then.
I have also treated myself to a beautiful stool from Restoration Hardware (love this shop!) and I adore its vintage look.

Now, all that's left to do is to open the boxes, all 5 of them !!! Wish me luck.

17 March 2013
{Pin of the week} Piñata Cake !
Remember the Piñata Cookies I pinned a while ago ? Well today I present you the Piñata cake !!! What a fantastic idea from A Subtle Revelry.


14 March 2013
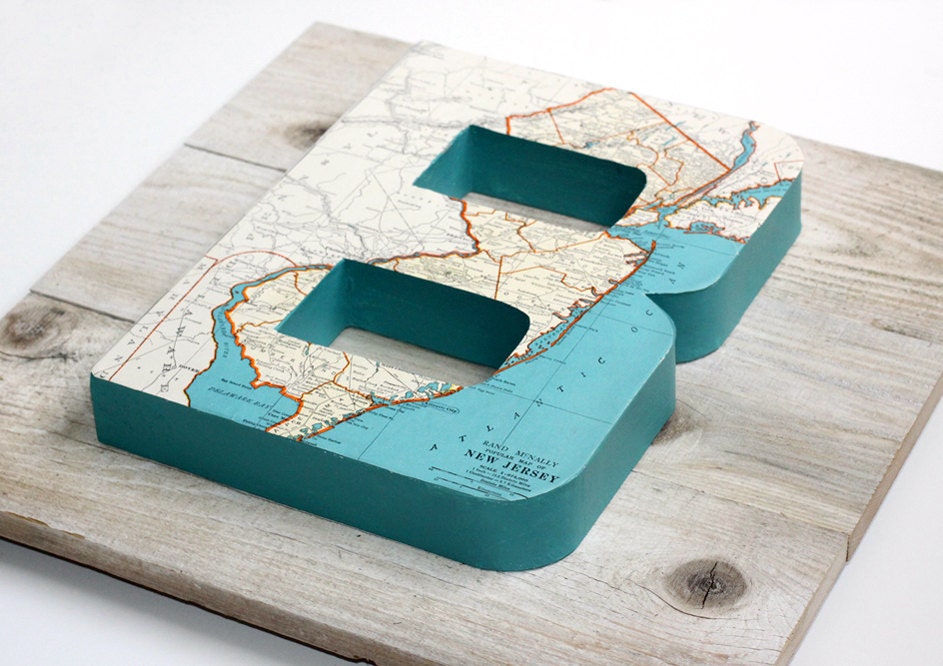
{Party Inspiration} Vintage map crafts
Continuing with my inspiration for an aviator birthday party, today I am showing you some great crafts using vintage maps.

.jpg)

.jpg)


11 March 2013
{Craft} Easter animals jars


What a difference a can of spray paint makes... ;-)


9 March 2013
{Pin of the week} La Parade des Langues de Chat !
I am so happy to start this "pin of the week" section again because I love to share with you some beautiful or clever things I have seen in blogland during the week.
 This week, I couldn't resist the cuteness of this "langue de chat" parade from Keep Cool Kitchen for Lait Fraise. Langues de chat (literally "cat's tongues", for their shape) are French, they are super thin crispy biscuits. I loved them as a kid and I still enjoy them a lot today !!!
This idea of dressing them up for the carnival is genius ! Aren't they super sweet ???
Follow the link for the recipe.

This idea of dressing them up for the carnival is genius ! Aren't they super sweet ???
Follow the link for the recipe.
8 March 2013
{Craft} Easter egg box Cupcake holder

From my inspiration post last week, you'll know that I quite like the Meri Meri Egg box.
So I decided to make my own little cupcake holder out of an egg box and of course it had to match the Easter Banner I am making.
This is a very easy craft which I think will look super cute on my Easter dessert table !

If, like mine, your egg box has a printed label inside the lid, you'll have to cover this part.

Glue in place inside the lid.
I added an extra lace ribbon at the front to finish it off nicely.

7 March 2013
{Party Feature} Let's Fly
This Let's Fly party from Jayme Marie Designs was featured today on Amy Atlas's Sweet Designs and I especially noticed it because I am planning a vintage aviator party for my little boy who will be 2 next month...
I like the simplicity and the basic colour scheme of red, white and blue.
 If you have been ready this blog for a while you will know I adore those paper garlands. They are so quick to make and yet so stylish! I have used them both for Chloe's Rainbow Birthday Party and Ice Cream Parlour.


I like the simplicity and the basic colour scheme of red, white and blue.


Paper straws do make all the difference in the beverage station! They are so cute.

I like the stamped cutlery.

5 March 2013
{Craft} Easter Banner
I recently went on a mission to find a good kid craft book so I have been borrowing loads from our local library (which fortunately has a huge choice!).
One I am really enjoying reading is Hand in Hand by Jennie Doh. Every project is made by a different blogger and there is a little interview of the person behind the project as well as detailed instructions to complete the craft.
You will be sure to find something age appropriate for your children within the 20 projects offered. We already made a couple of the easier crafts with my daughter and it has been a lot of fun spending time together this way.

When I first saw this banner I knew straight away this was going to make a perfect Easter banner. I am trying a sort of patchwork look for Easter with different colors and textures and I figured the banner was a great fit with my theme.

Mine is not quite finished (for a start it does not spell Easter yet !) but I wanted to share my work in progress with you. I am quite pleased with it and it was a great project for the week end. I have included some drawings and little notes my daughter wrote for me to make it more personal.

I started by making six different shapes flags. I followed the advice from the book and hand drew the shapes to give a more homemade feel. I cut my shapes out of cardstock to have a "base" on which I could start working.
I then gathered a huge pile of papers, ribbons, drawings, stickers... and started cutting and gluing onto the base flags until they were completely covered.
One I am really enjoying reading is Hand in Hand by Jennie Doh. Every project is made by a different blogger and there is a little interview of the person behind the project as well as detailed instructions to complete the craft.
You will be sure to find something age appropriate for your children within the 20 projects offered. We already made a couple of the easier crafts with my daughter and it has been a lot of fun spending time together this way.
When I first saw this banner I knew straight away this was going to make a perfect Easter banner. I am trying a sort of patchwork look for Easter with different colors and textures and I figured the banner was a great fit with my theme.
Mine is not quite finished (for a start it does not spell Easter yet !) but I wanted to share my work in progress with you. I am quite pleased with it and it was a great project for the week end. I have included some drawings and little notes my daughter wrote for me to make it more personal.
I started by making six different shapes flags. I followed the advice from the book and hand drew the shapes to give a more homemade feel. I cut my shapes out of cardstock to have a "base" on which I could start working.
I then gathered a huge pile of papers, ribbons, drawings, stickers... and started cutting and gluing onto the base flags until they were completely covered.
1 March 2013
{Craft} St Patrick's day Cupcake Toppers


Last week, while unpacking our boxes, we found a box of Hama Beads (Perler Beads in the U.S.) and the girls decided to spend an evening making shapes with them.
The next day I had a thought: wouldn't it be fun to make cupcake toppers out of beads ? With St Patrick's day round the corner, we decided to make a hat, a rainbow and a pot of gold. A quick search on google and we had found our designs. So we made 3 cute cupcake toppers and as a bonus we got to spend some crafting time together as a family.
Well the very next day, while reading my favourite blogs, I found 2 other projects using those beads... what a coincidence. Is this a new trend ???
Anyway, here is a quick how to. Can't be easier than this.
Hama Beads Cupcake Toppers
All you need to make a topper is a Hama Bead design, a skewer and a hot glue gun. Of course any design will work, so you can match your design to any party theme.

So, which one do you prefer ? My favourite is the rainbow !


Subscribe to:
Posts
(
Atom
)


