Image Map

28 May 2013

{Recipe} French Strawberry Tart


My favourite dessert of all times ! I LOVE strawberry tart.
I love the seasonality of it, waiting all year to finally be able to buy those beautiful and fragrant strawberries, what a treat !!!

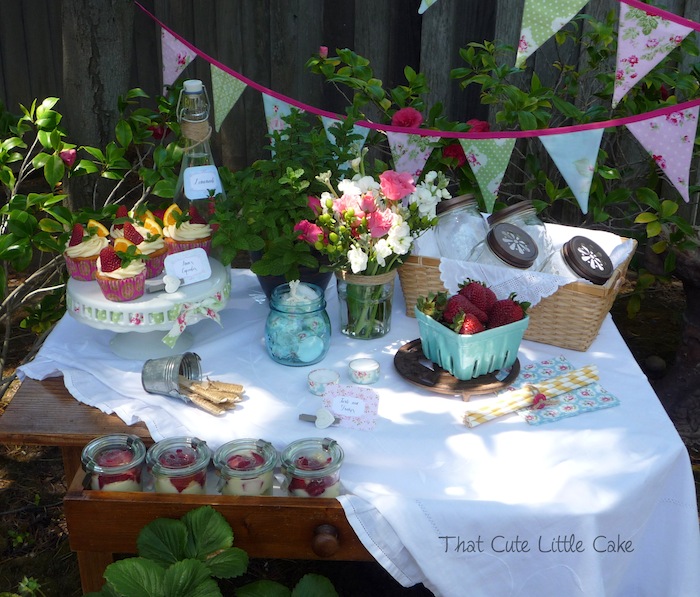
Since the theme of this table was a picnic, I decided to present them in jars instead of the traditional round (and very fragile) tart.
Prepare them in the morning, close the lid, and place them in the fridge until party/picnic time. Super easy.

We made some more the day after the party and they were a huge hit with my children. I wouldn't normally have them help me with strawberry tart as the pastry is quite delicate, but having them prepare them in jars was so much fun !!!

The French strawberry tart is not a strawberry shortcake. We don't use cake here but a sweet shortcrust pastry called "pâte sablée".
You may use either whipped cream or creme patissiere for the filling, I prefer the later.


To assemble the jars
Cut the pastry in small pieces and place a few at the bottom of the jars.
Spoon (or pipe) some creme patisserie over the pastry.
Finish off with a few pieces of strawberries.

Please read on for the recipes of the pastry and the cream.


Creme Patissiere recipe
From Faites votre Pâtisserie, by Lenôtre

Makes about 450g of cream (which was just enough for 6 little jars)

250ml Milk
1/2 vanilla pod
3 egg yolks
75g caster sugar
20g cornstarch

Bring the milk to the boil in a pan with the vanilla pod cut in half lengthwise. 
While the milk is warming, whisk together the egg yolks and the sugar until the colour is a light yellow. Add the cornstarch on top without mixing.
Take the vanilla pod out of the milk, and pour the hot milk over the egg mixture while mixing gently.
Pour the mixture back into the pan and bring to the boil while whisking constantly. Let it thicken for about 3 minutes but never stop whisking.
Pour immediately into a clean bowl and let it cool completely before using to fill the pastry base or the jars. To avoid a dry crust forming on the cream while it cools, cover with cling film making sure the film is in contact with the cream.


Sweet Shortcrust pastry recipe
This is my mum's recipe and it is well worth the effort of making the pastry yourself, this is so much better than any store bought version !

Makes 600g of pastry, enough for two medium sized tarts (you can freeze half the dough for later !)

Seeds from 1 vanilla pod
50g ground almond
3 egg yolks
250g plain flour, sifted
5g baking powder
200g unsalted butter, soft
150g icing sugar, sifted
pinch of salt

Cut the butter in small pieces and put in a mixing bowl.
Add salt, vanilla seeds, icing sugar and mix until creamy.
Add the egg yolks, one by one, until you have a smooth dough.
Add the ground almond and about 1/4 of the flour and mix well.

Add the remaining of the flour + baking powder and knead well.
Make a ball and wrap in cling film. Place in the fridge and leave to rest for at least 1 hour (best overnight).

Take the dough out of the fridge and let it warm up for about one hour.
Grease a tart tin with butter.
Spread the dough with a rolling pin and place in the tin.
Gently prick the bottom with a fork.
Place a sheet of parchment paper over the dough and cover with beans.

Preheat the oven at 160 degree C
Bake at 160 C for 10 minutes
Take out the parchment sheet with the beans and bake for another 5 minutes at 180 C.
You want the edges to be slightly golden (not brown).
Let it cool.


26 May 2013

{Pin of the week} Sequinned Applique Stir Sticks from The Inspired Bride

I'm in n love with these glam stir sticks ! I do like a bit of glitter...
You can find the DIY instructions at The Inspired Bride.
And you can see the rest of the styled photo shoot here, it looks amazing !
Have a great week end.


23 May 2013

{Recipe} Pimm's Cupcake


This is one of my favourite cupcake recipes ! The cake and frosting are sweet, with a hint of Pimm's and the surprise heart is fresh and fruity, what a perfect combination !


Pimm's Cupcakes
Makes 12 cupcakes

CAKES
125 g unsalted butter, soft
125g caster sugar
2 tbsp Pimm's No.1
2 eggs
125 self-raising flour
1/2 tsp baking powder
3 tbsp semi-skimmed milk

Preheat oven to 180C and line muffin tin with cases
Add the butter, caster sugar and Pimm's and cream together using an electric mixer for 7 minutes, or until light and fluffy
Add the eggs, one by one, and mix for 2 minutes
Add flour and baking powder and mix until incorporated
Add milk and mix for a further minute
Fill cases and bake for 20 minutes
Remove cupcakes from tin and leave to cool on a wire rack

FROSTING
125g unsalted butter, soft
1 tbsp Pimm's No.1
250g icing sugar, sifted
2 tbsp semi-skimmed milk

Cream the butter and Pimm's together in the mixer for 2 minutes, until light and fluffy
Add icing sugar and milk and mix for a further 2 minutes
Chill in refrigerator until ready to use

HEART
2 strawberries
5 raspberries
2 slices peeled orange
2 slices peeled cucumber
A few mint leaves

Make a fruit puree by blending fruits and mint together

TO ASSEMBLE THE CUPCAKES
Use an apple corer to remove the centre of each cupcake and fill with the fruit mixture. Pack in gently with your finger then replace the sponge core.
Top the cupcakes with the frosting and decorate with some fruits and mint leaves 


21 May 2013

{Girls Cocktail Night} Pimm's Night


Finally the pictures of my little soiree !
I really enjoyed creating a mini dessert table for our girlie gathering. The Vintage British picnic theme allowed me to reuse some decorations (like the pretty fabric banner) from Chloe's Ice Cream party last year.
I made it a challenge with myself not to go over board in terms of time AND money and I think I pretty much achieved this. I did stick to my shopping list and only shopped for food, drinks and flowers on top of it. Everything else I already had !

My intention is to host two more girls Cocktail Nights this year, and I will reveal the next theme pretty soon... If this one was for spring, the next one should be perfect for summer :)

Enjoy the pictures and make sure to come back on Thursday and Friday for the recipes!

I took these pictures in the afternoon, the light was amazing.


French Strawberry Tarts, in jars !

Pimm's Cupcake


Ready for the girls !

As the afternoon became evening, it was so pretty with the candles and the soft light.

19 May 2013

{Pin of the week} Biscuit flip flops

How fun are these flip flops decorated biscuits from Living Locurto ???
Follow the link for some very creative Pool Party ideas. I love it all !


Have you noticed the sweet little sugar sand castle in the background ?

18 May 2013

{Craft} How to create a tissue paper FIRE backdrop


Here is the full tutorial as seen on the original feature post over at Amy Atlas's Sweet Designs.
This was pretty easy to create but so effective to get the 3D fire effect.


Linky Parties

17 May 2013

{Craft} How to create a City Cake Pop Display

Hope you enjoyed the Fireman Birthday Party pictures yesterday !
Here is how I made the city backdrop I used as cake pop display.


Notes:
- Sourcing the grey wrapping paper was not so easy. I do understand why nobody wants to wrap presents in grey (it sure does not scream fun !!!) but I really wanted this color....
Anyway, after searching high and low and visiting all the local party stores, I found mine at Paper Source and it was well worth the $5 a roll. The paper is thick and has a lovely matt finish, exactly what I needed for this project.
- The foam blocks I kept from my craft furniture delivery a few weeks ago ! The boxes were full of blocks in different sizes, just what I needed :)


Linky Parties


16 May 2013

Fireman Birthday Party


Finally, all the pictures from the Fireman Party I created for my son's 2d Birthday!!! I only had two weeks to make it happen (you can read why here...!) but I am very pleased with the result. The background looks exactly how I had envisioned it, so I am happy !!!

Scroll down to the end for a list of tutorials already on the blog. There is also a link for the tutorial featured on Amy Atlas's blog Sweet Designs: How to make the Fire backdrop.
I will be posting one last tutorial tomorrow to explain how I created the buildings/cake pop display.

Get ready for picture overload !!!
Enjoy :)


Many thanks to two very talented ladies: Holly from Mimi's Dollhouse and her beautiful printables, and Ansley from Goodness by Ansley and her amazing cake pops.

Other supplies:
Grey vinyl tablecloth (with a metal like finish) and red buckets: Party City
Washi Tape: Michael's

Tutorials:


Linky Parties


Related Posts Plugin for WordPress, Blogger...